Finding the 200-gallon tank was a real surprise. You might expect to find such treasure in Arizona or in Florida ... but surely not in Manchester, Tennessee. My son deserves the credit for this one. He happened to spot an "Everything for Sale" sign in front of an aircraft "parts yard" and called to ask if I wanted to check it out. To make a long story short, six scrapped 200-gallon tanks were "parked" in the back and, naturally, my heart skipped several beats when I saw them. We contacted the owner, Chris Rounds, and told him what we had found and that I sure wanted to buy one of the tanks. Chris told me to pick what I wanted and, in spite of my obvious excitement, quoted a fair price. (His comment was "it's all scrap to me ...")
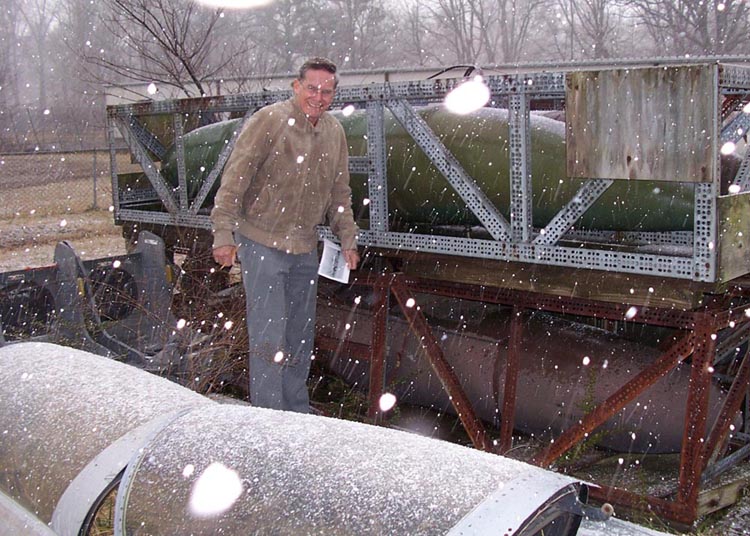
As you can tell by looking at Figure 1, it was a cold and miserable day when we found the 200-gallon tank. Given the really cold wind and the blowing snow, we did remind ourselves that Tennessee is in the southeastern US ... and, yes, those white things in the picture are snow flakes.
Note: You can enlarge the pictures by clicking on them. Many of the pictures can be enlarged some more by placing the cursor on them and clicking again. Then maximize the window to get an even closer look.
Given the throughly rusted bolts and other strange-looking fasteners that held the metal crate together, it took us several hours to liberate the tank, leaving us with numb faces and fingers. Actually, my son did most of the work -- he is a lot stronger than I am and he has remarkable analytical and mechanical skills that make tough jobs look easy.
To avoid writing the sequel to Gone With the Wind, let's just say that it took me a few months to make the tank presentable again. (At least to the point where the contours were correct and the really bad oxidization was a bad dream.) However, repairing the remaining substantial damage was clearly beyond my pay grade, so one of the really good guys in this world, Charles Dawson, came to the rescue by putting me in touch with Mike McConnell. Mike was willing to tackle the repair job without busting the budget ... but he lived in Hendersonville, TN, a 90-minute ride from the F-100 Building.
Charles volunteered to load the tank on his pickup and drop it off at work (in Nashville) the next morning. Figure 2 shows Charles (on the right) preparing to take the tank home for an overnight stay. (As you can probably tell by looking at the picture, Charles is a former Marine who served as a MediVac pilot during the Vietnam war. He has hard-earned Purple Hearts to certify that he had a tough job. He also jokes that he has more experience crashing Hueys than most Huey pilots.)
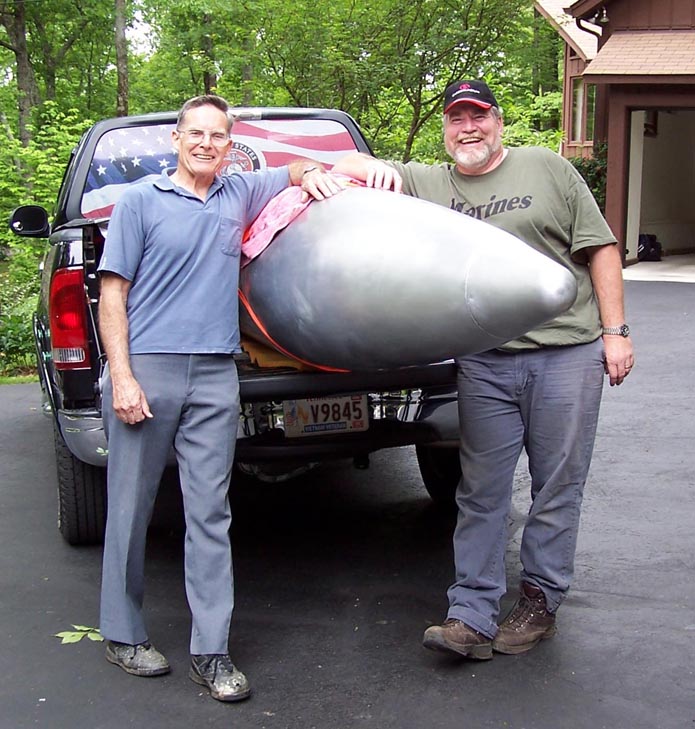
Figure 2 shows that the 200-gallon tank did not quite fit on the pickup truck's bed, so the cleaned tank back end was very visible. Just before Charles drove off, my wife asked him if he expected to be arrested for transporting a bomb. No problem, right? Well, in this post-9/11 world, worries abound. So perhaps it's not surprising that -- the next morning on the way to work -- Charles was pulled over by a police officer before he even made it to the interstate. Charles was told that somebody had called the police department to report a man driving a pickup truck with a missile on the back. After Charles explained that the "missile" was an F-100 Super Sabre 200-gallon inboard droptank, he was cleared to continue and the officer told him that he would call in to make sure that Charles would have no further adventures. However, a few miles after turning north on the interstate, Charles was pulled over by a Highway Patrol Officer ... who told him that he had heard the radio call about the F-100 tank. To make a long story short, the officer's dad had been an F-100 pilot in Vietnam and the son -- the Highway Patrol Officer -- just wanted to see that 200-gallon tank. After a few minutes of conversation, Charles was on his way again. (Unfortunately, he did not ask the officer for his dad's name ... if he's still alive, that man could supply some good material -- stories and pictures -- for the Super Sabre Database Project.)
Mike McConnell picked up the tank and drove it home after work -- no problems. Figure 3 shows the tank after Mike had spent three months working on it during weekends. Apparently, a scrapped tank gets little respect during its storage years. Sometime during those scrap years, it had been dropped on its nose. Aside from the fact that the rough handling produced a sizable dent on the lower front bottom segment, the nose section was no longer aligned properly. The months of work finally paid off ... the nose and center sections look new. (Actually, they basically ARE new. In fact, they are BETTER than new.) The nose section is finally "in spec" again, the center section is actually round and dent-free, and the tail end is beginning to look respectable.

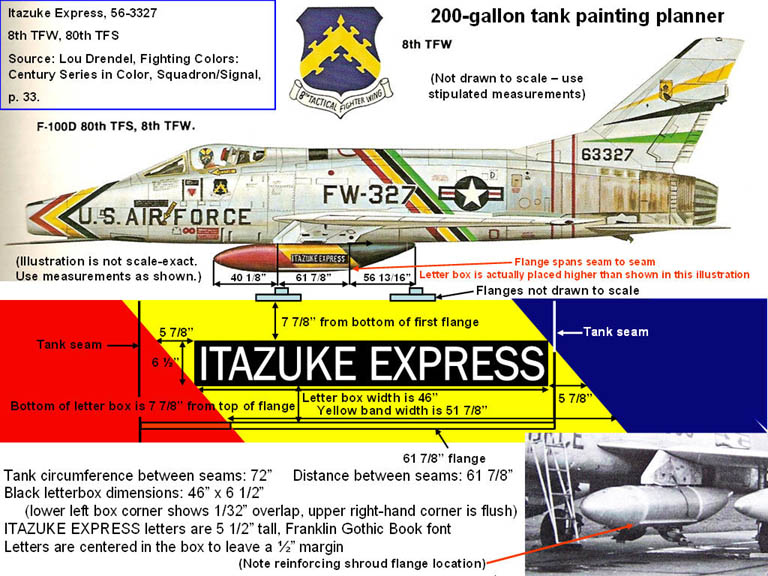
The paint planner for the very bright "Itazuke Express" colors is shown in Figure 4. (I do all the designs in PowerPoint and then do a screen capture of the slide to create illustrations like the one you see in Figure 4.)
After the tank was repaired, it was time to prepare the painting templates. Figure 5 shows the basic layout work in progress. I'm making sure that the angles and dimensions match the illustration you see in Figure 4 and that the "Itazuke Express" lettering will be properly spaced.
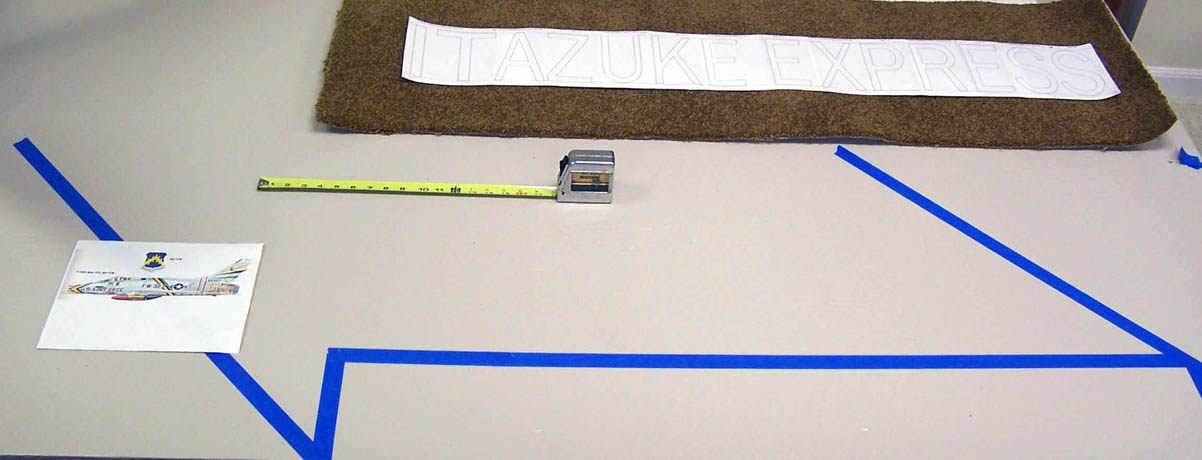
Figure 6 traces the effort it took to get the 200-gallon tank ready for its final painting. Mike is a perfectionist, so he made sure that the tank's surface was properly prepared for the final paint job. (You have no idea of the number of hours spent on smoothing, sanding, more sanding and wet-sanding.)
Cell 1 shows the 200-gallon tank after the first base coats had been applied. And, yes, there was more sanding between the applications of the base coats.
Cell 2 shows the 200-gallon tank after the application of the final primer. This primer ensures that the final paint layer will adhere properly.
Cell 3 shows the initial taping. Because final red/yellow/blue paint scheme requires diagonal segments, each tape segment follows a compound curve along the tank surface. Therefore, I had to get (very expensive) flexible tape from an automotive paint shop. (Regular painter's tape will wrinkle when you stretch it across a compound surface, thus producing less than clean lines along the diagonal.) Applying the tape was a real adventure ... I spent several hours measuring, taping, remeasuring, and retaping. Doing the bottom segment meant lying on my back and working up ... my old neck discovered that my head weighs a lot after an hour or so. (Incidentally, Mike took pity on me after I had finished the taping ... he applied the wax paper to protect the middle and tail sections from overspray.)
Cell 4 shows Mike attaching the stencil to make sure that the letter box will be properly sized and placed. At this point, the three colors have been applied, a coat of clearcoat has sealed the colors, and the clearcoat has been wet-sanded. (Incidentally, the yellow on the center portion has been sprayed over a coat of white paint to give it more brilliance. If the yellow had been applied over the grey base coat, it would have retained a slightly greenish tinge.)
|
First set of base coats 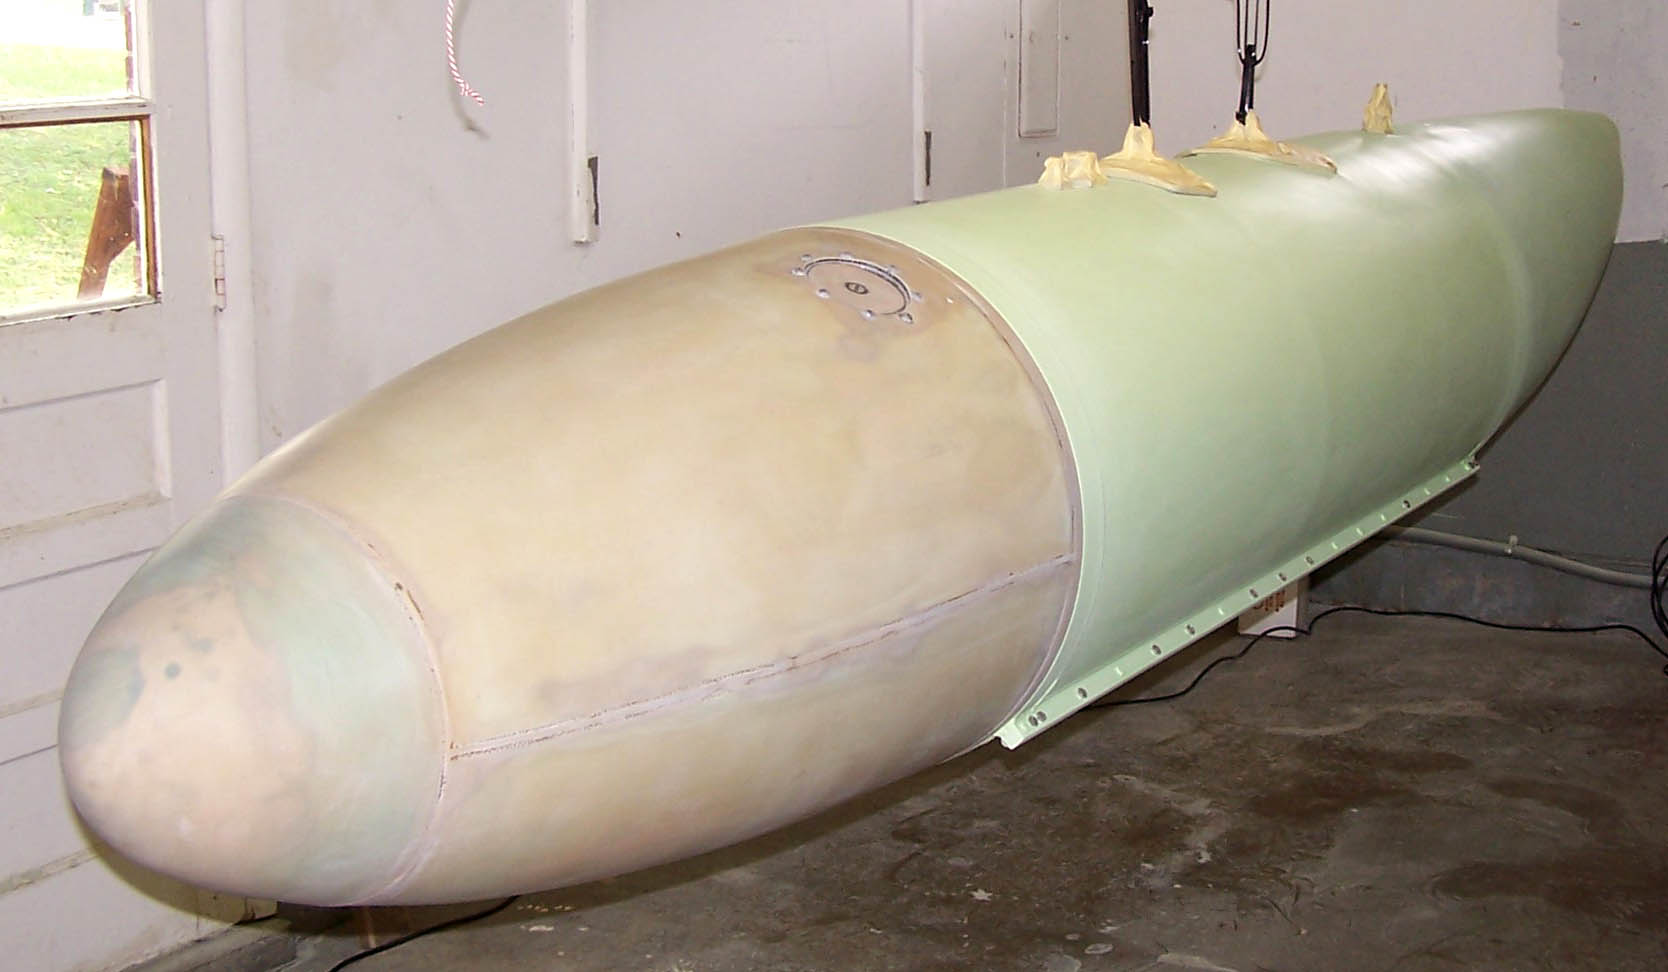 |
Two final base coats 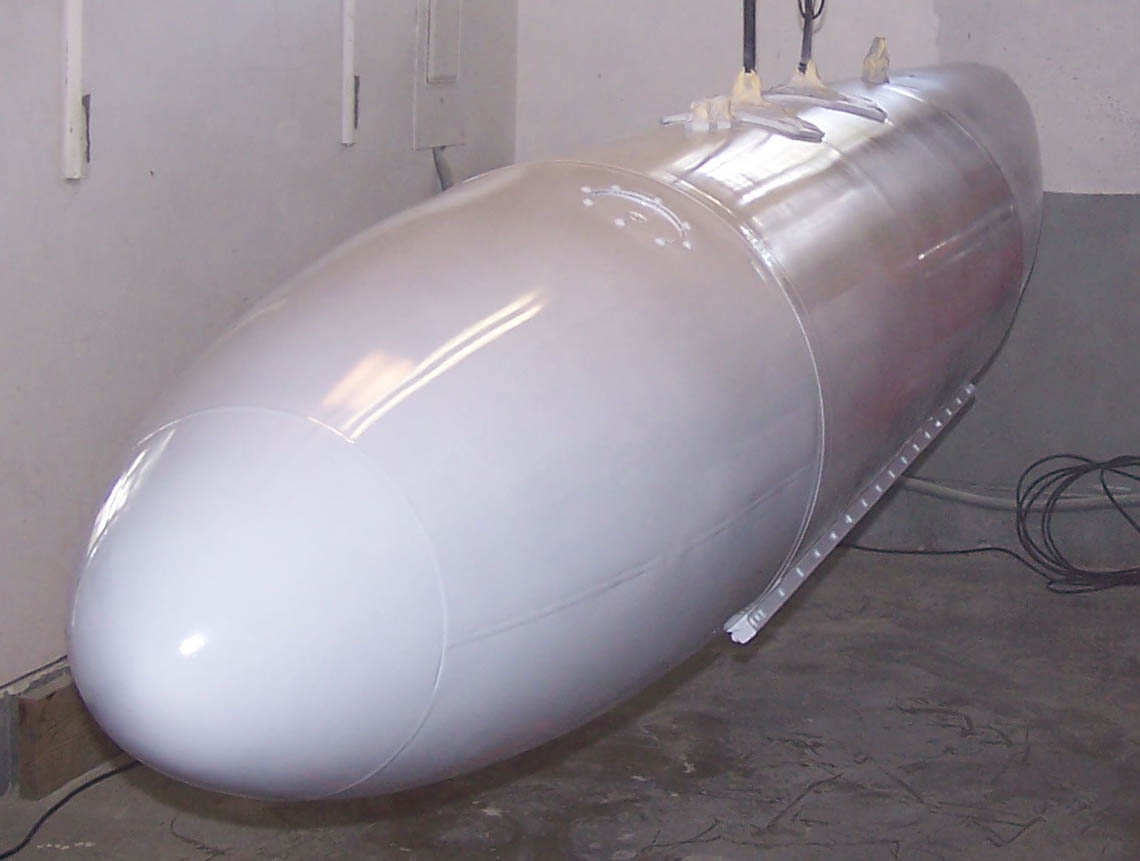 |
|
First taping 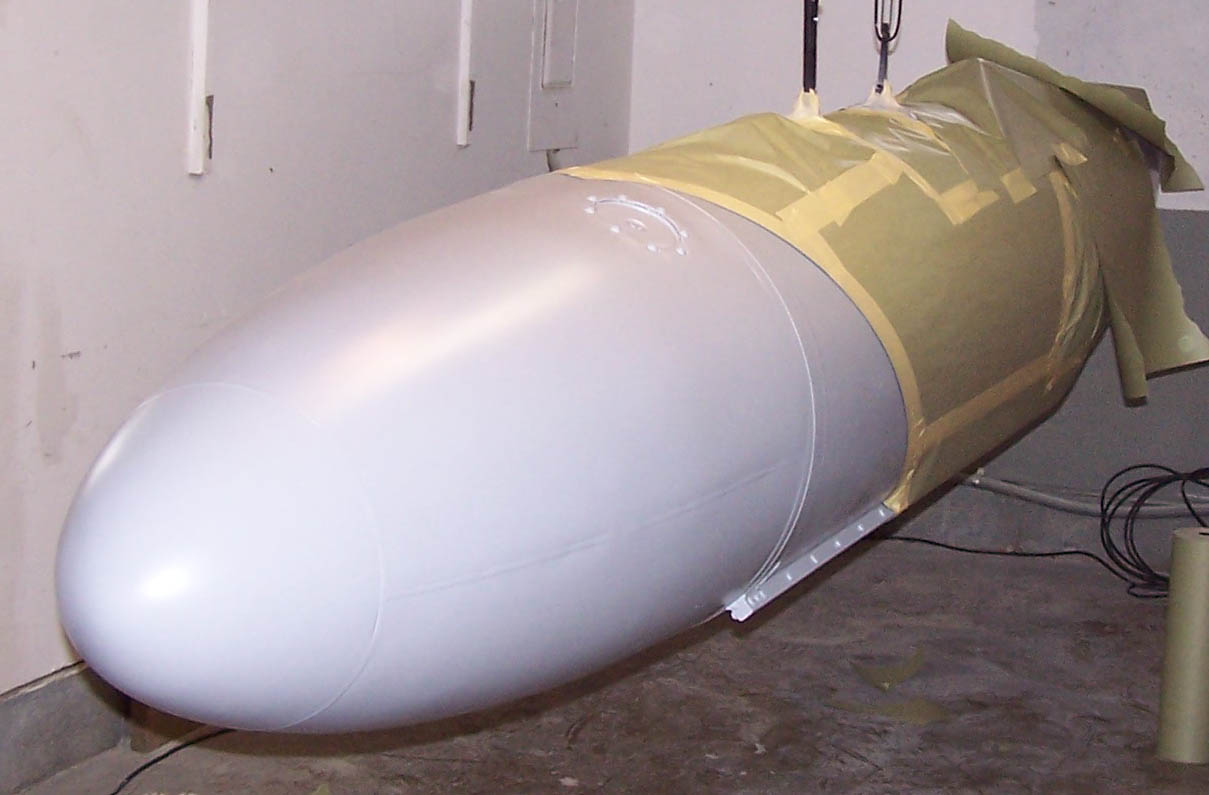 |
Placing the stencil 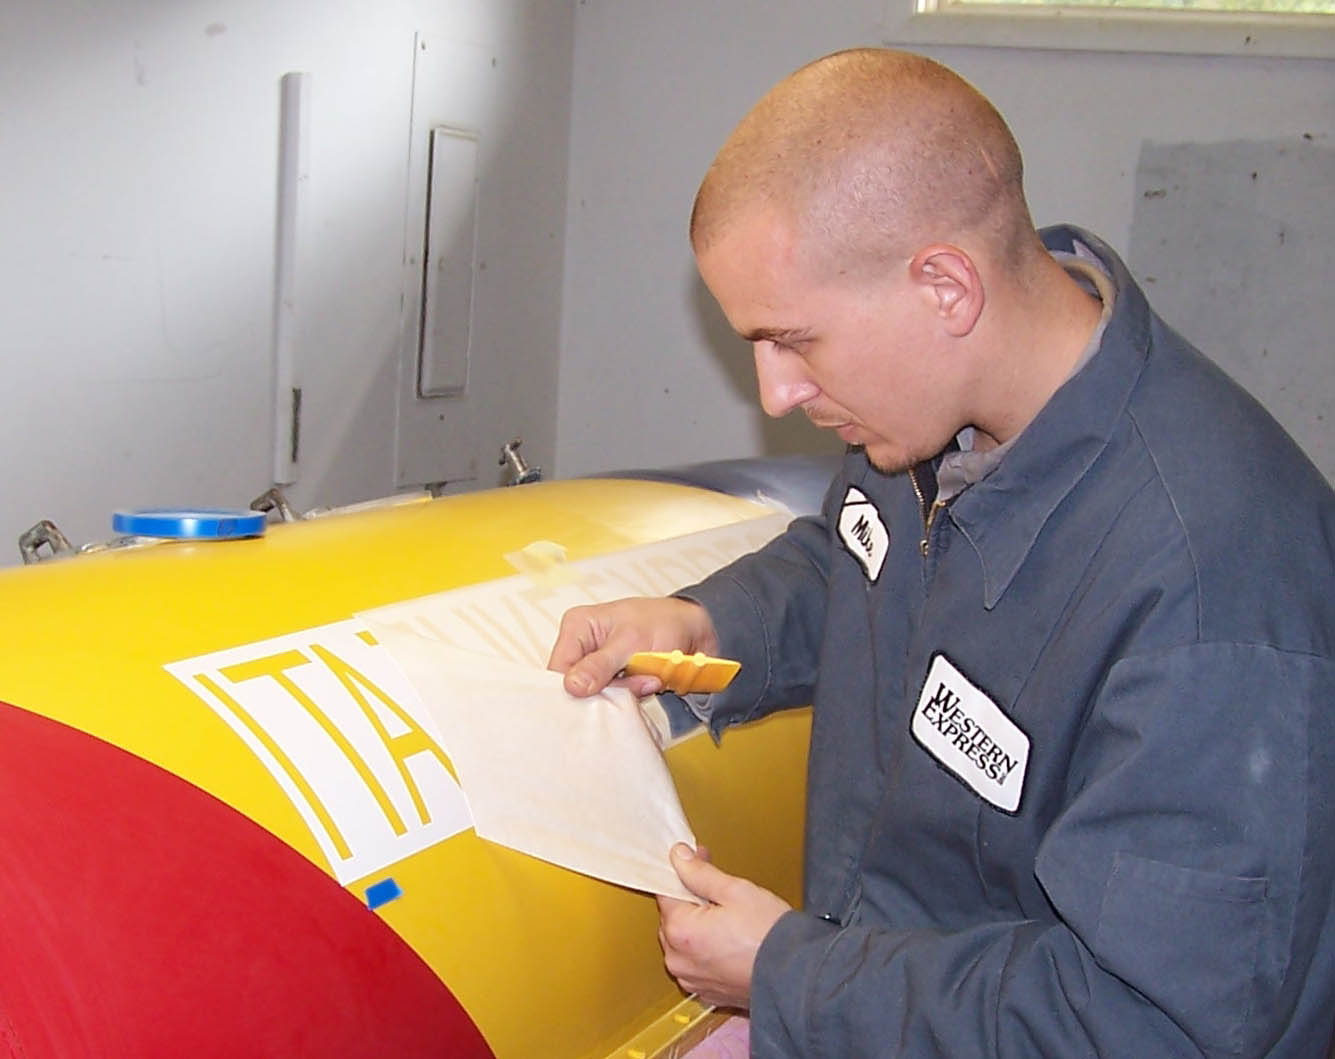 |
Figure 7 shows the completed letter box in Cell 1. As you can see, the stencil produced the correct font and spacing for the Itazuke Express label. Note that there is still some white residue on the red, yellow, and blue sections. This residue was left after the wet-sanding of the clearcoat was done.
Cell 2 shows the completed 200-gallon drop tank on its cradle in the F-100 Building. (Note the restored tail hook in the background.) As you can see, the wet-sanding residue is gone and the final clearcoat layer produced a high gloss.|
Completed Letter Box 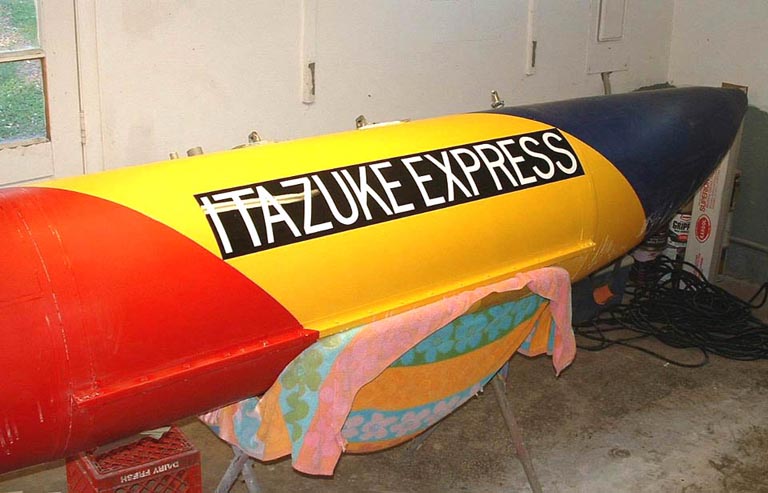 |
F-100 Building Display  |
The 200-gallon tank's restoration/rebuilding project started on 11 February, 2006. Mike put on the last clearcoat on 12 November, 2006. Charles Dawson made the delivery on 13 November, 2006. (This time, Charles had an uneventful trip ... but he sure encountered many "second looks" and lots of finger pointing.)
This "model" is absolutely gorgeous and Mike can be justifiably proud of the superb work he has done. I truly appreciate his help with this project.
While Mike was working on the 200-gallon tank, Steve Rettell and I stayed busy with other F-100 parts and pieces. The most ambitious rebuilding job will be the fuselage. Please check the Restorations link and then select the Fuselage link to see what's happening there. (I will update that page from time to time to show you how the fuselage work is progressing.)
For the serious aircraft modelers among you, Figure 8 shows the 200-gallon tank's dimensions. The measurements -- to the nearest 1/32 inch -- have been made multiple times to try to be as accurate as possible. To make sure that I could duplicate the tank accurately, I have also taken numerous detail photos.
|
Tank Dimensions 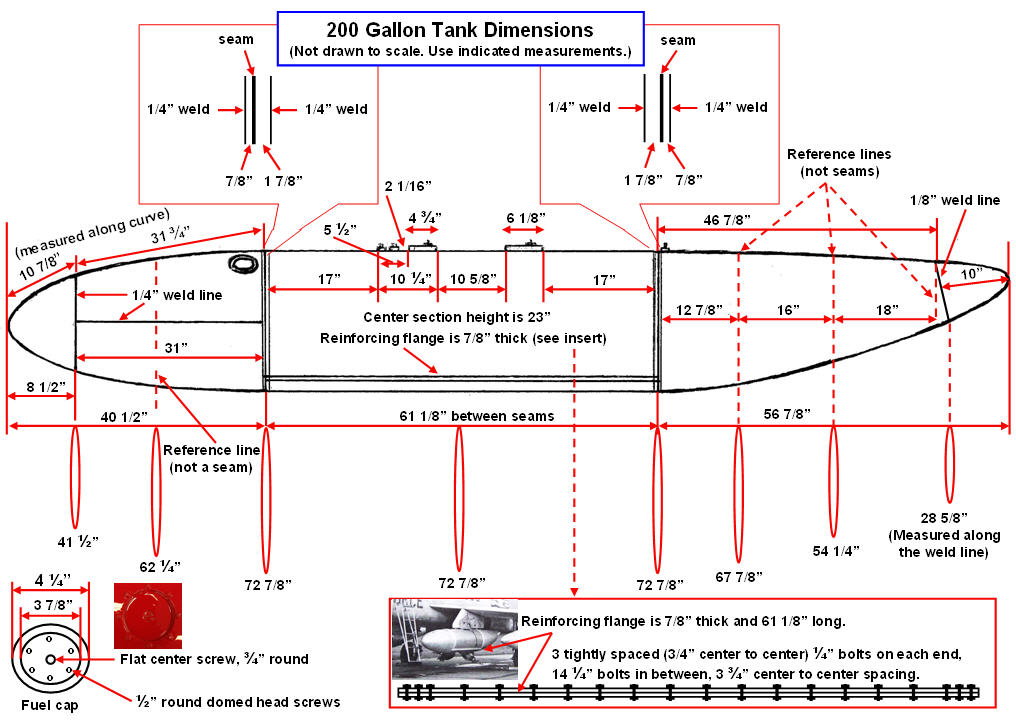 |
Component Dimensions 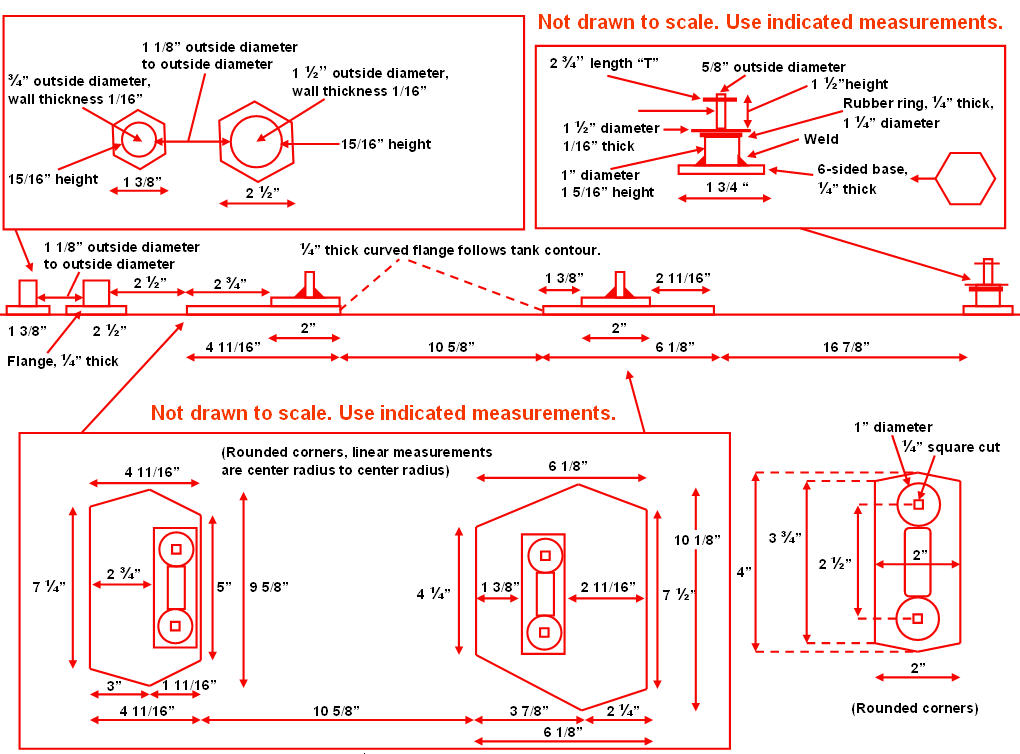 |
While the rebuilding and restoring efforts are important, please remember that the main focus of the F-100 project is its database. If you can supply stories and pictures that reflect your experience with the Hun, please do so. (You can click on the Contact me link to send me an email.) The objective is to develop a very comprehensive personal history of the Hun and of the people who flew and maintained her. You and the Hun deserve to be remembered in your own words.
If you want to return to the home page, you can either click on the
Home
link shown here or by
clicking on the
Home
link shown on the navigation bar on the left side of your screen.
(You can always use any of the navigation bar links to move around
this website.)